As a supplier of Bonded Type Evaporators, I understand the importance of proper installation to ensure the optimal performance of these essential components. In this blog post, I will guide you through the correct installation process of a Bonded Type Evaporator, providing you with detailed steps and valuable tips.

Understanding the Bonded Type Evaporator
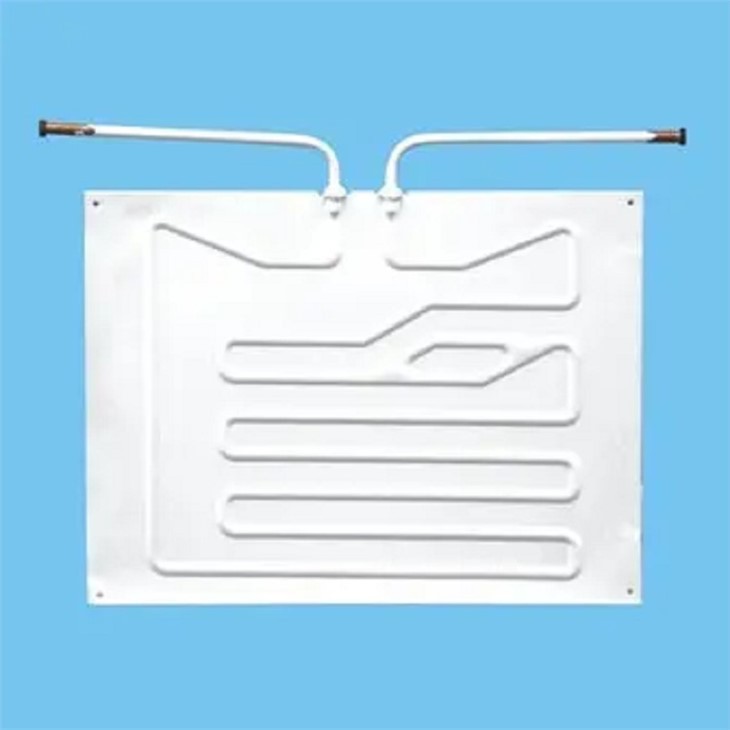
Before diving into the installation process, it's crucial to have a basic understanding of what a Bonded Type Evaporator is. A Bonded Type Evaporator is a key component in refrigeration systems, designed to absorb heat from the surrounding environment and convert the refrigerant from a liquid to a vapor state. This process is essential for cooling and maintaining the desired temperature in refrigerators, freezers, and other cooling applications.
The Bonded Type Evaporator is typically made up of a series of tubes or channels bonded together, which allows for efficient heat transfer. These evaporators are known for their high efficiency, compact design, and durability, making them a popular choice for various refrigeration systems.
Pre-Installation Preparation
1. Gather the Necessary Tools
Before you start the installation, make sure you have all the necessary tools at hand. Some of the common tools required for installing a Bonded Type Evaporator include:
- Screwdrivers (both flathead and Phillips)
- Wrenches
- Pliers
- Pipe cutters
- Brazing torch and brazing materials
- Vacuum pump
- Refrigerant charging equipment
2. Read the Manufacturer's Instructions
Each Bonded Type Evaporator may have specific installation requirements and guidelines provided by the manufacturer. It's essential to carefully read and understand these instructions before proceeding with the installation. The manufacturer's instructions will provide you with detailed information on the correct installation procedures, safety precautions, and any specific requirements for your particular evaporator model.
3. Inspect the Evaporator
Before installation, thoroughly inspect the Bonded Type Evaporator for any damage or defects. Check for any bent tubes, leaks, or other visible signs of damage. If you notice any issues, contact the supplier immediately to arrange for a replacement.
4. Prepare the Installation Area
Ensure that the installation area is clean, dry, and well-ventilated. Remove any debris, dust, or other contaminants from the area. Make sure there is enough space around the evaporator for proper installation and maintenance.
Installation Steps
1. Mount the Evaporator
The first step in installing a Bonded Type Evaporator is to mount it in the appropriate location. The mounting location will depend on the specific application and the design of the refrigeration system. In most cases, the evaporator is mounted inside the refrigerator or freezer compartment.
- Use the mounting brackets or hardware provided with the evaporator to secure it in place. Make sure the evaporator is level and properly aligned.
- Connect the evaporator to the refrigerant lines using the appropriate fittings. Use a pipe cutter to cut the refrigerant lines to the correct length, and then use a brazing torch to join the lines together. Make sure the brazing is done properly to prevent leaks.
2. Connect the Electrical Wiring
Once the evaporator is mounted, the next step is to connect the electrical wiring. The electrical wiring will typically include the power supply, the fan motor, and any other control components.
- Follow the manufacturer's instructions to connect the electrical wiring correctly. Make sure all the connections are secure and properly insulated.
- Test the electrical connections to ensure that the evaporator is receiving power and that all the components are functioning properly.
3. Vacuum the Refrigeration System
Before charging the refrigeration system with refrigerant, it's essential to vacuum the system to remove any moisture, air, or other contaminants. This will help to ensure the proper operation of the system and prevent any potential issues.
- Connect a vacuum pump to the refrigeration system using the appropriate fittings.
- Turn on the vacuum pump and allow it to run for at least 30 minutes to achieve a deep vacuum.
- Monitor the vacuum gauge to ensure that the vacuum level is stable and within the recommended range.
4. Charge the Refrigeration System
Once the system has been vacuumed, it's time to charge it with refrigerant. The amount of refrigerant required will depend on the specific evaporator model and the size of the refrigeration system.
- Use a refrigerant charging scale to measure the correct amount of refrigerant.
- Connect the refrigerant charging equipment to the refrigeration system using the appropriate fittings.
- Slowly add the refrigerant to the system, following the manufacturer's instructions. Make sure to monitor the pressure and temperature of the system during the charging process.
5. Test the System
After the refrigeration system has been charged with refrigerant, it's important to test the system to ensure that it is functioning properly.
- Turn on the refrigeration system and allow it to run for at least 30 minutes to stabilize.
- Monitor the temperature and pressure of the system to ensure that they are within the recommended range.
- Check for any leaks in the refrigerant lines or connections. If you notice any leaks, immediately turn off the system and repair the leak before continuing.
Post-Installation Tips
1. Regular Maintenance
To ensure the long-term performance and reliability of the Bonded Type Evaporator, it's important to perform regular maintenance. This includes cleaning the evaporator coils, checking the refrigerant levels, and inspecting the electrical connections.
2. Monitor the System Performance
Keep an eye on the performance of the refrigeration system to detect any potential issues early. If you notice any changes in the temperature, pressure, or other operating parameters, investigate the issue immediately.
3. Follow Safety Precautions
When working with refrigeration systems, it's important to follow all safety precautions. This includes wearing appropriate protective gear, working in a well-ventilated area, and following the manufacturer's instructions.
Conclusion
Installing a Bonded Type Evaporator correctly is essential for the optimal performance of your refrigeration system. By following the steps outlined in this blog post and adhering to the manufacturer's instructions, you can ensure a successful installation and a long-lasting, efficient refrigeration system.
If you have any questions or need further assistance with the installation of a Bonded Type Evaporator, please don't hesitate to contact us. We are here to help you with all your refrigeration needs. Whether you are looking for a Refrigerator Evaporator or a Bonded Type Evaporator for other applications, we have a wide range of high-quality products to meet your requirements. Contact us today to discuss your needs and explore our product offerings.
References
- Manufacturer's installation instructions for Bonded Type Evaporators
- Industry standards and best practices for refrigeration system installation